Tune Up: Mastering, Polishing and MP3's
posted in: Features • Reviews & Playlists
 Every recording artist out there knows about mastering. You want to bounce down your audio and create a final master to duplicate the track to your CD’s so that it is of similar volume and quality to the rest of the tracks on that album. Today, though, mastering is a broader topic. Whether for an album or an MP3 download, mastering is a means for preparing a file for its distribution and final format destination. If you recall the Generation DIY post about mastering, you know that it is an art. It’s very tough to master but there are resources for artists that aren’t comfortable doing it themselves. This week, we’ll focus on how to make your final track sound better within the mastering phase. We’ll give you some clear-cut steps to mastering your audio, explain some of the formulaic techniques behind the process and, finally, give you some insight into the different approaches when you’re mastering material for different applications. If you aren’t experienced in the mastering phase and require more of a “step-by-step” process beyond this discussion, please access this great article.
How To:
Without getting too complicated or hypothetical, mastering has a few key steps and some simple tricks. While you may not be a professional mastering engineer, the steps can be used to simply put the final touch on your mixes. Our top three steps are compression/normalization, equalization and reverb. As far as the tools are concerned, it’s common to go with software. Whether you choose an audio editor or a DAW, you’ll achieve similar results. DAW’s seem to work a little better because you can assign real-time plug-ins and adjust them to taste during playback.
Equalization is usually the first step when to improve the quality of a final mix. Even after all of the notching, panning, boosting and shaping done in mixing, the tracks can often lack a little punch. Therefore, it’s good to have a nice graphic EQ with a lot of bands so that you can use some subtle shaping on the final mix (i.e. make it a little more bass-heavy, or a little brighter, etc).
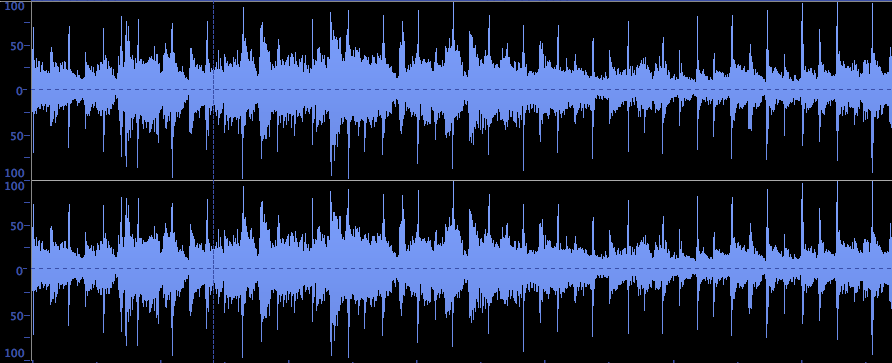
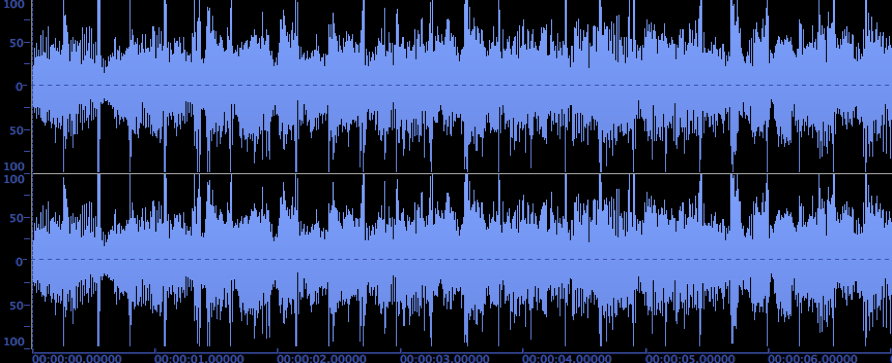
Compression and normalization for rock/pop applications will essentially just make your track louder. In today’s music industry, tracks are compressed and normalized so much that they are as loud as possible for the entirety of the song. Compression basically sets a volume threshold on an audio file, and any time a signal comes in at a louder volume than that threshold, it dampens it to the volume you specify. Therefore, it flattens out the dynamic range of a file, allowing you to boost the entire thing even louder without clipping. This boosting to maximum volume is called normalization. See pictures of both an uncompressed and compressed audio file for the same portion of the same song below:

Uncompressed, Normalized

Compressed, Normalized
Our final step is usually adding a touch of reverb on the final mix. Even if ambient spacing and subtle reverb was added during the mixing phase, it’s good to apply a small amount to the final mix to give the entire song a space. This isn’t a common practice with some do-it-yourself mastering engineers, but we think it gives songs a bit of an edge (especially in a band or singer/songwriter setting). Be careful here; a little goes a long way because too much will muddy things up.
Applications and Technical Information:
Even if you already know about these steps, you might still be unsure how it all works. You may also be wondering the best way to master a free Mp3 download. First, let’s briefly clear up the difference between MP3s and CD-quality files. Traditionally, CD’s utilize uncompressed, raw audio files. Whereas, MP3 files are compressed and altered using an algorithm that eliminates certain parts of the spectrum. Let’s go further. An MP3 utilizes critical band information to determine which parts of the audio file can be eliminated without losing much quality. Simply put, our ear picks up certain frequencies within the same range (think about a band on an EQ). Therefore, if a loud frequency and a quiet frequency are heard by our ear within the same band, we won’t hear the quieter one that well anyway. So, the MP3 algorithm eliminates it entirely.
iTunes MP3
What does this all mean for the final song? While the difference is sometimes tough to hear unless you have high quality speakers, MP3s have a decidedly thinner sound. They don’t have all the dynamic range and nuance of, say, a WAVE or an AIFF file (for the algorithmic reasons specified above). So, we need to take this into account when mastering and bouncing the mix. As is the case with many technical topics, this could become an extremely lengthy explanation. However, we’ll give you a few tips. When mastering a WAVE/AIFF file that is, in fact, going to remain in its original format, be sure to record, edit and master at 16 bit, 44.1 kHz for CD quality. You can also master intuitively. What you hear while mastering is what will be heard on a CD since the format won’t change.
However, if the final file will be in MP3 format (and in today’s industry, chances are it will be), record the raw audio at a higher bit-depth or sampling rate to help compensate for the lost data when converting to MP3 (making sure to keep it at the highest possible quality until the last conversion stage). We would also recommend some more compression and a higher boost in bass, as many people will probably listen to your track on ear buds and you need to compensate for their frequency/dynamic shortcomings.
Overall, when you get to the mastering phase of your recording, there is a lot to it by way of tech-related information. Do some Google searches or check out the article that we linked you two in the first paragraph. There are many people out there writing other articles but keep in mind that mastering is the final stage. Whatever you do here will be heard. So compress it as much as you like, add as much high-end as you want. It’s the final touch before sending it off into the world.
