Tune Up: Mixing Beyond Volume
posted in: Features • Reviews & Playlists
 If you’d been reading the OurStage Blog, you’ve undoubtedly been keeping up with the best ways to achieve success in your musical career yourself thanks to the Generation DIY posts. In a similar vein, this week’s Tune Up will focus on the most neglected aspects of a home mix. Once you’ve gone through the process of recording your songs, you’ve got a big pile of sequenced audio that will most likely sound weak, muddy or unpolished. We have some simple tricks you can utilize in the mixing stage to remedy this problem.
Mixing is a familiar concept for most people who record their own tracks. But you probably aren’t sure what the process really entails. Sure, you know that you need to adjust the volume of the different parts of your mix (i.e. if the snare drum is too quiet, boost it so it can be heard). But, you might notice that your mix is starting to get muddy, the vocals aren’t cutting through quite enough or maybe you just aren’t getting enough of that guitar twang. Well, there are a lot of techniques used by mixing engineers that have nothing to do with volume. In the interest of importance and simplicity, We’ll highlight some of the most important tricks.
Equalization
Just like mixing, everyone is familiar with the concept of equalization, and some are even pretty talented at making that great guitar sound using their DAW’s EQ. But, let’s step back a moment. EQ isn’t just about making the individual instrument sound good. In fact, when it comes to mixing, that isn’t the goal at all. When dissected, some of the best radio mixes would contain individual instruments that sound really bad. Let’s lay the technique out for you.
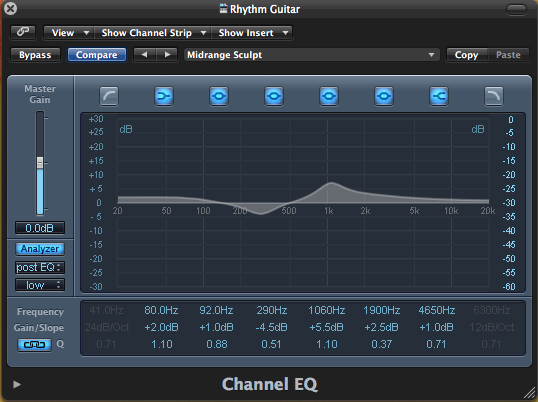
Say you’re mixing a guitar track and a piano track. They’re both comping some chords and filling out the accompaniment for that big chorus. You’ve EQ’d your guitar sound so that it sounds great. You’ve got some nice EQ boosts at certain frequencies. But, it sounds really muddy alongside your keys track. Well that’s because the piano, in this case, occupies a very similar frequency range as your guitar. So, now we have a flood of similar notes traveling through similar frequency bands, making everything clogged with sound. The simple solution: Go to the piano’s EQ and cut a little bit of its sound right in the same frequency ranges that your guitar’s EQ has been boosted. Note the pictures below. The EQ’s have opposite peaks and dips:

Rhythm Guitar EQ: Boosted around 1050 Hz, cut around 290 Hz

Keys EQ: Boosted around 285 Hz, cut around 1050 Hz
Not only does this allow you to keep track of my overall volume outputs, but it clears your mixes right up. Please keep in mind that this isn’t an exact science. You won’t need to cut/boost at opposite frequencies on all tracks exactly. Play around with the EQ to find the clearest positions. If you’re having trouble figuring out which frequency ranges need to be boosted in a given track, use a graphic EQ. Create a very narrow band, boost it to maximum level, and sweep it across the whole EQ left to right. You’ll hear certain points where the sound seems to resonate. Boost these to get a rich sound. Chances are, other instruments will have different resonant peaks. Therefore, you can cut and boost opposite peaks on different EQs, creating a clearer mix. You can also use this “narrow band sweep” technique to determine problematic frequencies and cut them from that track. This is called “notching”.
Pan and Reverb
 The other important mixing techniques are probably also a little obvious, but often underused. Pan has been a staple of recording forever. You may be familiar with it because of its use for laying out harmonies in a mix, or creating that great stereo image for a drum set. However, panning tracks for mixing purposes can be very effective in more subtle ways. Say, for example, you have lead vocals and lead guitar performing simultaneously. It’s best not to pan these hard left and right, because this comes through a little awkwardly in the final track (and the listener might not be sure what the focal point is supposed to be). However, positioning them just a few clicks on either side of dead center will clear it up in the speakers. You may not hear the difference individually, but it does help to make the tracks sit better in the mix.
Reverb is the final touch when mixing a track. While, it’s a familiar effect for making instruments sound terrific and assigning them a great modeled space, you can use it to clear things up even further. We’ll go back to thelead vox/guitar example on this one. Let’s say you assigned the reverb of a much larger room to the lead guitar than the vocals (i.e. a more distant sound for the guitar). Suppose you also made more dry vocals come through than dry lead guitar. This would come across to the ear as if the singer is closer in space than the guitar. Thus, you’ll tend to hear them as much separate entities. Again, ˜verb is a awesome way for make something sound cool, but if used in this way, it can also clear things up.
While mixing is a process that is far more complicated than the scope of this article (and we would strongly recommend taking a look at some longer how-to articles online), we decided to take a break from gear reviews/recommendations this week and give you some tips. We can tell you that, even if that individual bass sound isn’t quite what you normally like, it might fit into the mix much better. Your instruments need to work as a team, and in the end, the clarity of your mixes will make the mastering stage easier and the listener more impressed.
